Hello, here are the steps I had to take to get single GPU passthrough working on Arch Linux with QEMU and an AMD GPU (specifically, a PowerColor Red Devil 5700XT 8GB), the problems i had to face and the solutions I found to said problems.
But first, why? Well, dual-booting Windows has always been a bummer to me. Sure, it works wonders in terms of performance for gaming, but having to reboot the computer and dedicating a specific amount of space for it always rubbed me the wrong way. With that being said, I’m no expert, there’s plenty of other reasons for using a VM instead of dual-booting, lots that I probably forgot and lots that I just don’t know about.
Supported Devices
| Vendor | Family | Common Name(s) |
|---|---|---|
| AMD | Polaris 10 | RX 470, 480, 570, 580, 590 |
| AMD | Polaris 11 | RX 460, 560 |
| AMD | Polaris 12 | RX 540, 550 |
| AMD | Vega 10 | Vega 56/64/FE |
| AMD | Vega 20 | Radeon VII |
| AMD | Navi 10 | 5600XT, 5700, 5700XT |
| AMD | Navi 12 | Pro 5600M |
| AMD | Navi 14 | Pro 5300, RX 5300, 5500XT |
| … | … | … |
Note that this list isn’t comprehensive, it merely contains the AMD GPUs that suffer from the same problems I faced[^1] and are certain work with steps I provide, even ones from NVIDIA are likely to work, read this similar guide.
Before begining make sure your machine has virtualization capabilities and that they’re activated. You can go to your BIOS and check it there.
(please note this was done on 5.18.7-arch1-1)
Packages
To follow this guide you should get the following packages,
| Name | Description | Repository |
|---|---|---|
| virt-manager(GUI), libvirt | Front-end for libvirt | APKG |
| qemu-full | System Emulation | APKG |
| dnsmasq, bridge-utils, openbsd-netcat, vde2 | Networking | APKG |
| libguestfs | Filesystem access, management | APKG |
| dkms | Dynamic module manager | APKG |
Editing Grub
Edit the file /etc/default/grub.
sudo nano /etc/default/grub
AMD CPUs
Find the line GRUB_CMDLINE_LINUX_DEFAULT="quiet splash" and Change it to
GRUB_CMDLINE_LINUX_DEFAULT="amd_iommu=on iommu=pt iommu=1 video=efifb:off quiet splash"
Intel CPUs
Find the line GRUB_CMDLINE_LINUX_DEFAULT="quiet splash" and Change it to
GRUB_CMDLINE_LINUX_DEFAULT="intel_iommu=on iommu=pt iommu=1 video=efifb:off quiet splash"
Then update grub and reboot.
sudo grub-mkconfig -o /boot/grub/grub.cfg ; sudo reboot
Once rebooted, check that the grub loader loaded the paramaters.
sudo cat /proc/cmdline
It should look similar to:
BOOT_IMAGE=/boot/vmlinuz-5.4.0-60-generic root=UUID=0587b30a-06cf-4df2-82fe-fb8db547e1c5 ro amd_iommu=on iommu=pt iommu=1 video=efifb:off quiet splash vt.handoff=1
Installing Virt-Manager and QEMU
First, make sure your system is up-to-date.
paru # Or any equivalent command
Run the following command to get the virtualizer and other useful packages installed:
sudo pacman -S qemu virt-manager dnsmasq vde2 bridge-utils openbsd-netcat libguestfs
Start and enable libvirtd, in my case, with systemctl.
sudo systemctl start libvirtd
sudo systemctl enable libvirtd
Edit the libvirtd configuration file.
sudo nvim /etc/libvirt/libvirtd.conf
- Verify the following values:
unix_sock_group = "libvirt"unix_sock_ro_perms = "0777"unix_sock_rw_perms = "0770"
Add the current user to the libvirt group.
sudo usermod -aG libvirt <username>
Edit the qemu configuration file.
sudo nvim /etc/libvirt/qemu.conf
- Verify the following values:
user = "<username>"group = "<username>"
Add the current user to the kvm group.
sudo usermod -aG kvm <username>
Restart the libvirtd service.
sudo systemctl restart libvirtd
Getting the GPU bios
Next, find out the PCI address of your GPU and it’s audio companion with,
lspci -nnk
There should be a VGA compatible entry (...) <name_of_your_card> and Audio Device (...) entries, only differing in the last digit. Save the addresses for later.
Now go to this website and find the bios for your GPU. Make sure to select the exact GPU you have and not a slightly different version. Create the following directory,
/var/lib/libvirt/vgabios/
And save the bios file here with a simple name such as 5700xt_rd.rom. Make yourself the owner of the file and change the permissions to read and execute at least for all types of users.
sudo chown <user>:<user> <name_of_rom> ; sudo chmod -R 775 <name_of_rom>
Setting up the VM
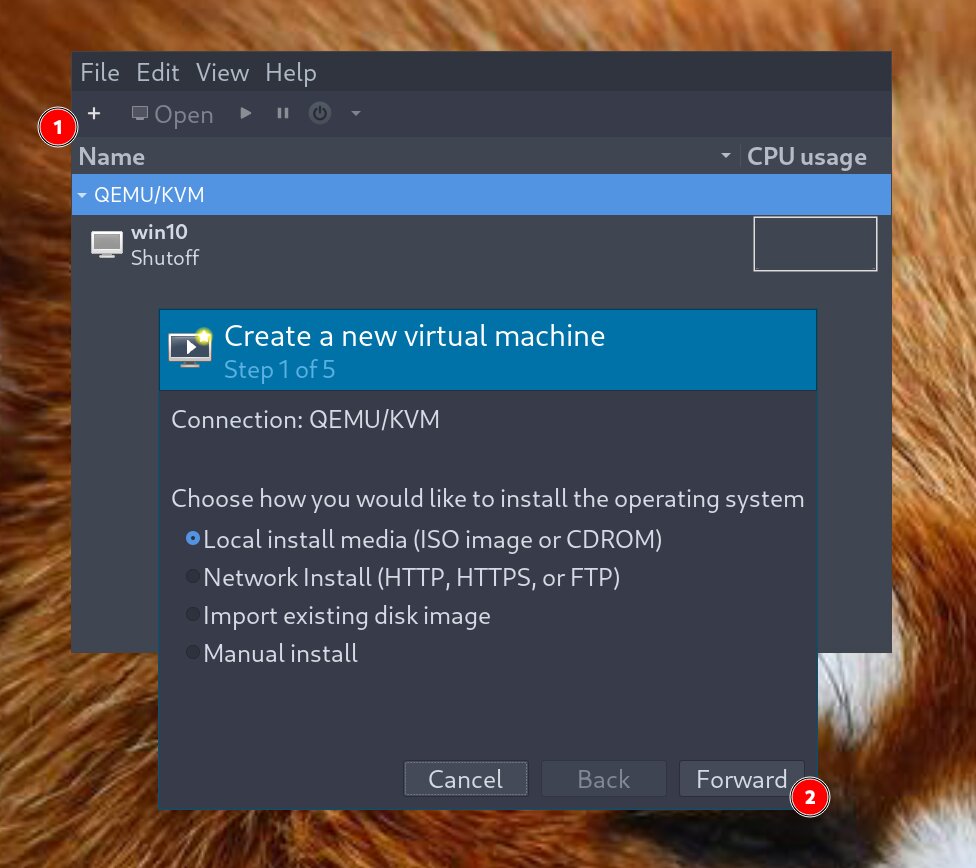
Open Virt Manager, click “create a new machine” (I’ll be doing a Windows 10 Guest) and proceed.
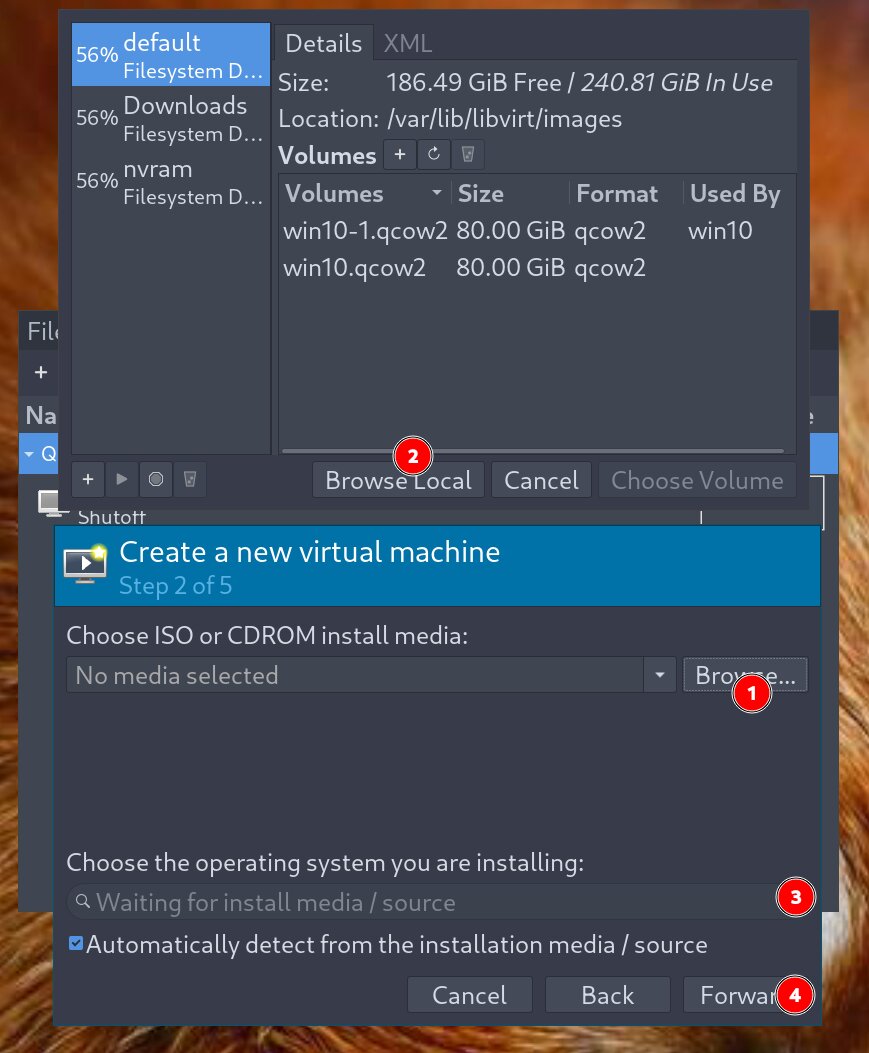
Browse your filesystem and select the image file for the guest, make sure Virt Manager indentifies the OS correctly (it should have automatic detection enabled by default) or otherwise, select one from the list yourself.
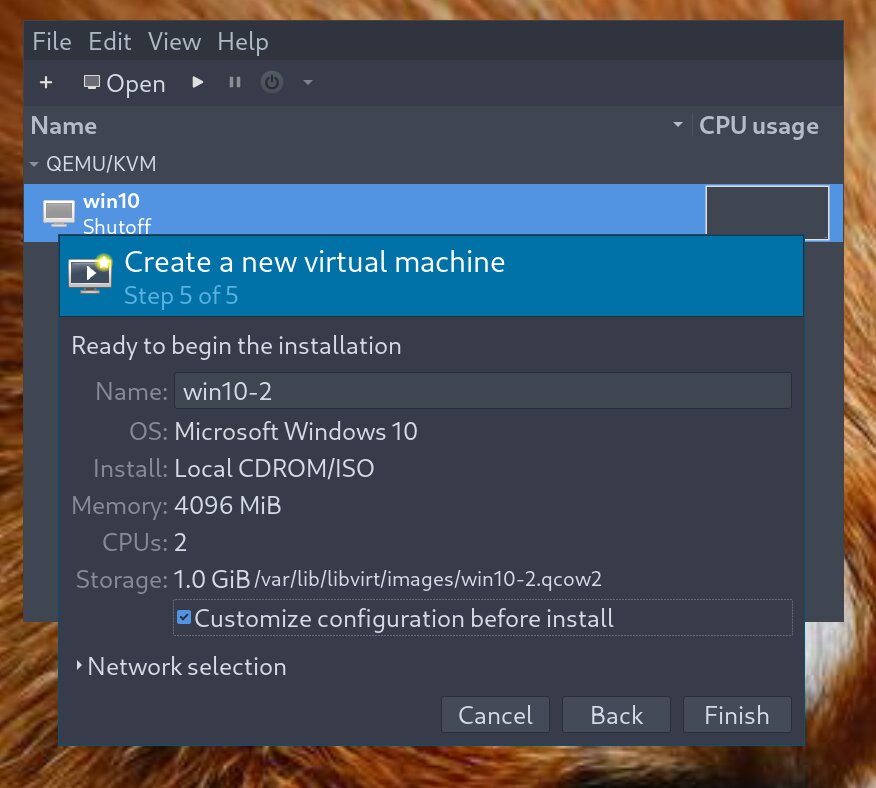
Select the amount of memory and cores you want to give to the system and the amount of storage space.
Tick “Customize configuration before install”.
Select Q35 as the Chipset and (...)x64/OVMF_CODE.fd as the firmware.
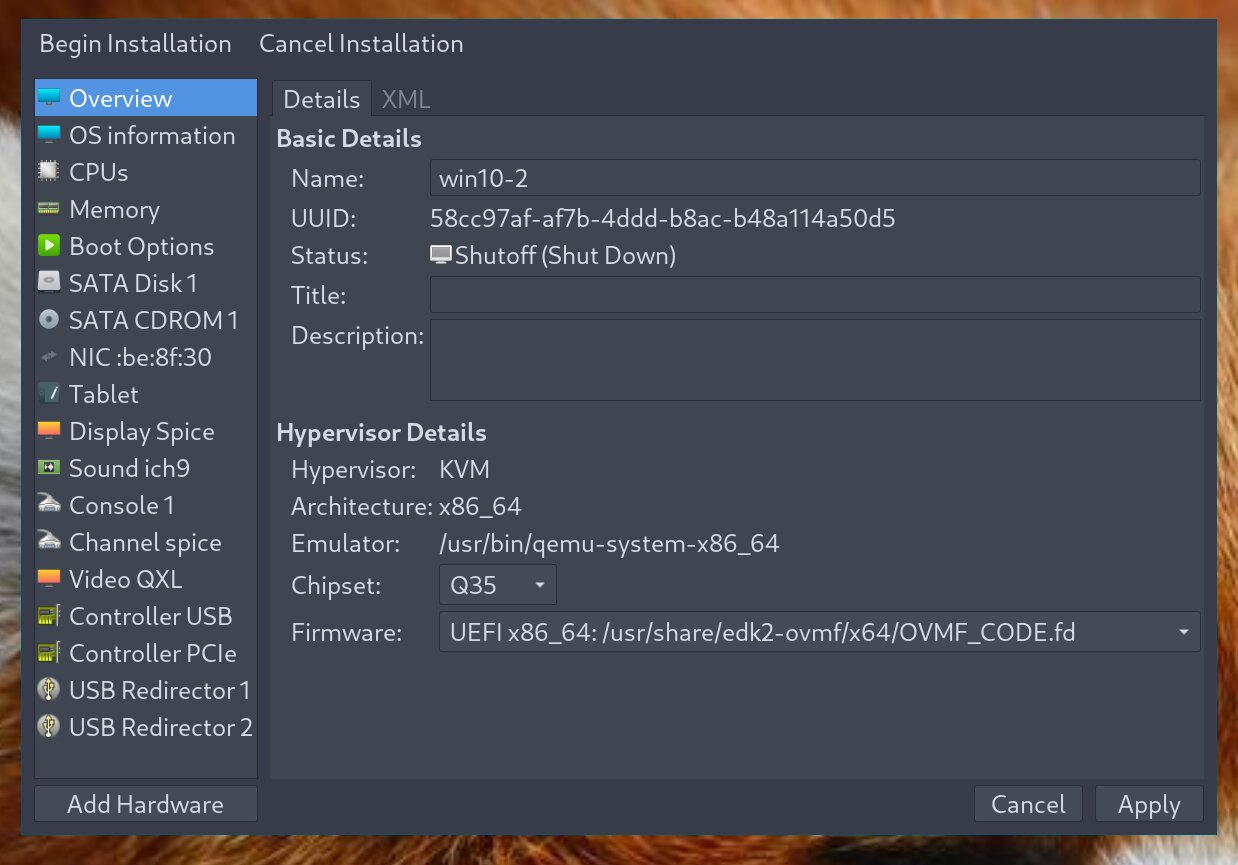
Click on the XML option tab above, find and remove <timer name="rtc" (...) and <timer name="pit" (...) just below it and change <timer name="hpet" present="no"> to "yes", this should prevent some unwanted performance loss.
Move to the CPUs panel, tick “Manually set CPU Topology” and make sure the # of sockets is less or equal to the number of physical cores on your CPU, then adjust the rest to match your needs.
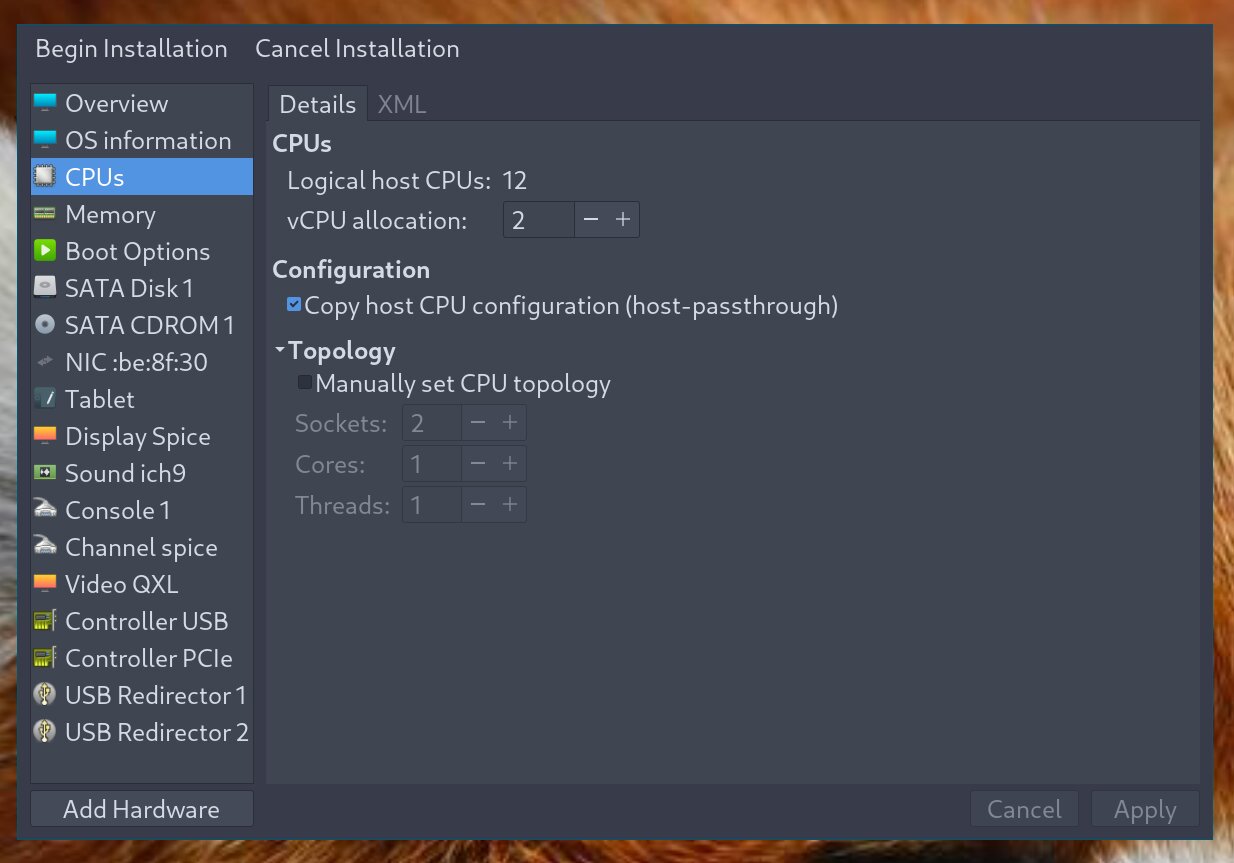
Apply the settings and begin installation.
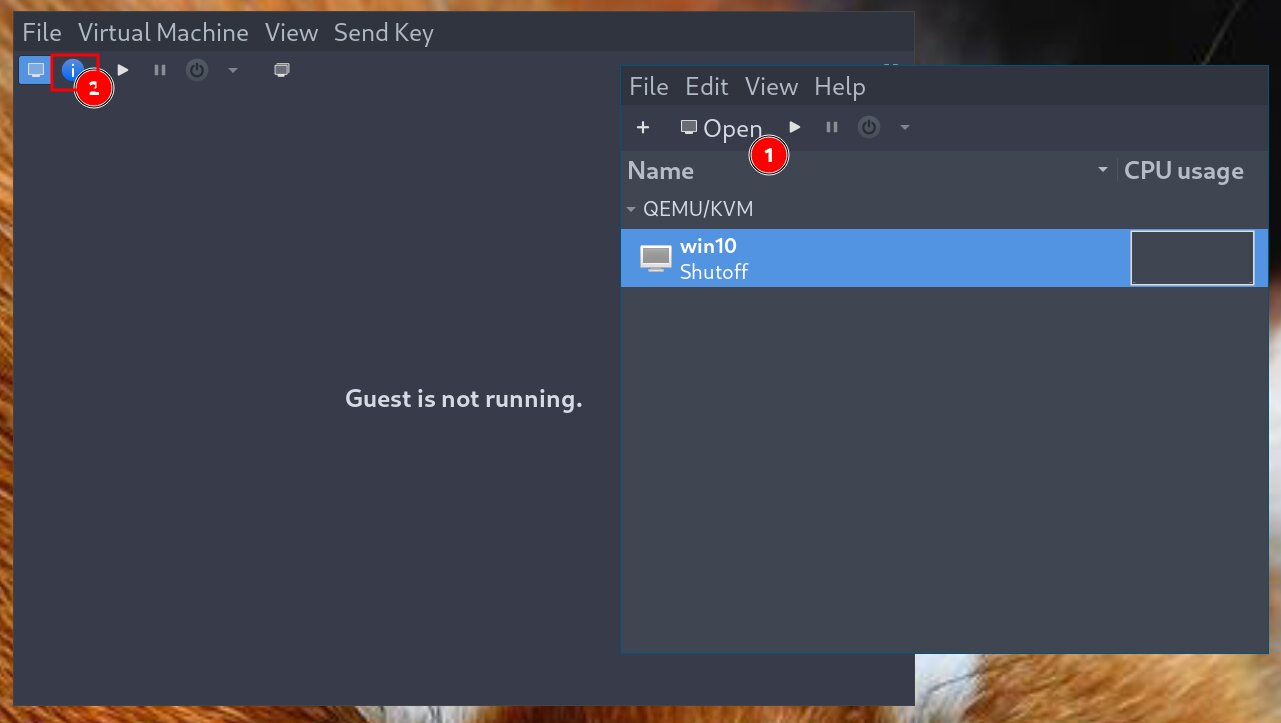
Once your guest system is installed, close it and re-open the settings page by selecting the machine, clicking Open, and selecting Show virtual hardware settings.
Right-click and remove the following items(* = necessary removal):
- SATA CDROM: the disc image just used for installing the system, no longer necessary
- Tablet: keep it if you want, but probably not going to need it
- Display Spice*
- Sound ich9
- Console
- Channel Spice*
- Video QXL*
- USB Redirectors*
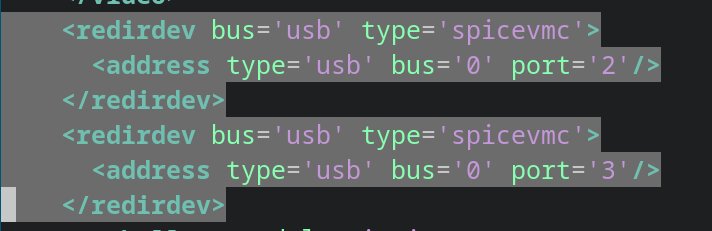
If you have trouble removing the ones marked with an extra symbol or any others
because of Spice etc etc, do the following sudo virsh edit <name_of_machine>, in my case
sudo virsh edit win10, then find all “spice” entries and remove them.
Click “Add Hardware”, select “PCI Host Device” and add your GPU and audio companion with the addresses saved from earlier.

Click “Add Hardware” again and add “USB Host Device” for your Keyboard, Mouse and other peripherals.
Adding USB Entries and then disconnecting the devices won’t allow the machine to start unless you add the specific flag. Also, unplugging devices after the machines has already booted and then reinserting them won’t work, you will need to restart the machine to use them again.
All these issues are fixed by using USB Redirection, which requires Spice, which we cannot use for single gpu passthrough…
Select the PCI Entry added for your GPU and click the XML tab, add the following between the </source> and <address (...)> lines.
<rom file="/var/lib/libvirt/vgabios/<name_of_rom>"/>
Installing scripts
Now, let’s install the scripts to realize the transition between Host and Guest Machines.
Clone this repository, get execute permissions with chmod +x install_hooks.sh and run the script.
Edit hooks/qemu by replacing “win10” with the name of your VM
OPERATION="$2"

if [[ $OBJECT == "win10" ]]; then
	case "$OPERATION" in
Now save everything and try running the VM, if everything loads normally, Great! Although, try shutting down afterwards… If you’re stuck with a black-screen and your GPU is one of the listed initially, then your card probably has the Reset Bug, which user gnif has provided a fix for.
vendor-reset fix
The only downside to this fix is that it has been a long time since it has been updated (at the time of writing), so it doesn’t work as properly as it did back when it came out, so I had to do some more digging. Since this is all open-source, the community has found a minor fix to overcome the problems brought with the newer linux kernels.
Anyway, either install vendor-reset with an AUR helper or clone the repository and install the patch with sudo dkms install ., now vendor-reset should be added as an out-of-tree kernel module. If the command fails it probably means you’re lacking linux-headers to build the module (remove the module with sudo dkms remove vendor-reset and after installing the headers, try again).
Create and edit the following file to make systemd automatically load the module at boot time /etc/modules-load.d/vendor-reset.conf,
vendor-reset
Edit /etc/libvirt/hooks/qemu to add the following line at the beggining of “prepare” and end of “release”.
echo 'device_specific' > /sys/bus/pci/devices/0000:09:00.0/reset_method
Reboot your PC and test the results!
Bugs, crashes, etc.
If you still find yourself getting errors, then try enabling libvirt logs.
/etc/libvirt/libvirtd.conf
log_filters="1:qemu"
log_outputs="1:file:/var/log/libvirt/libvirtd.log"
Credits, Links, etc.
- Single GPU Passthrough Scripts
- Single GPU Passthrough in Ubuntu AMD CPU/GPU
- Half of this guide but probably more complete and in video format (lole)
- QEMU/Virt Manager Introduction
- The virtio driver didn’t turn out necessary, but on a second try it did!
- Sharing files between Host and Guest Machines
- KVM-GPU-Passthrough Guide
- AMD GPUs don’t require patching
- VGABIOS Database
- Forums, More forums, YAF, YAFF
- Arch Linux Forums
- Arch Linux Wiki (mkinitcpio), Virt Manager
- Libvirt Wiki (hooks)
- vendor-reset, gnif talks vendor-reset